Wood furniture adds warmth, character, and often a touch of history to our homes. These cherished pieces can be passed down through generations, becoming treasured heirlooms. But time and everyday use can take a toll. Scratches, stains, and faded finishes can obscure the natural beauty of the wood, leaving you with furniture that looks tired and worn.
Key Takeaways
- Restoring wood furniture is often cheaper than buying new, high-quality pieces. Restoration materials and labor usually cost less than new furniture.
- Before restoring, it’s important to check your furniture for scratches, dents, watermarks, fading, and loose joints.
- Always wear proper protective gear and ensure good ventilation when using chemicals and tools during restoration.
- Modern techniques like eco-friendly methods, laser cleaning, and 3D printing for parts can make restoration faster and more sustainable.
This article will serve as your guide to wood furniture restoration, taking you step-by-step through the process. It covers everything from cleaning and repairs to refinishing, so you can breathe new life into your favorite furniture
Understanding Wood Furniture Restoration
Wood furniture restoration is the art and process of preserving and reviving wooden furniture, particularly pieces with sentimental or historical value. It goes beyond simply making furniture look presentable again.
The goal is to return the piece to a good condition, while retaining its original character and integrity. This can involve a range of techniques, depending on the extent of the furniture damage and the desired outcome.
Why Restore Your Wood Furniture?
There are many compelling reasons to choose restoration over replacing your beloved wood furniture. Here are some of the key benefits:
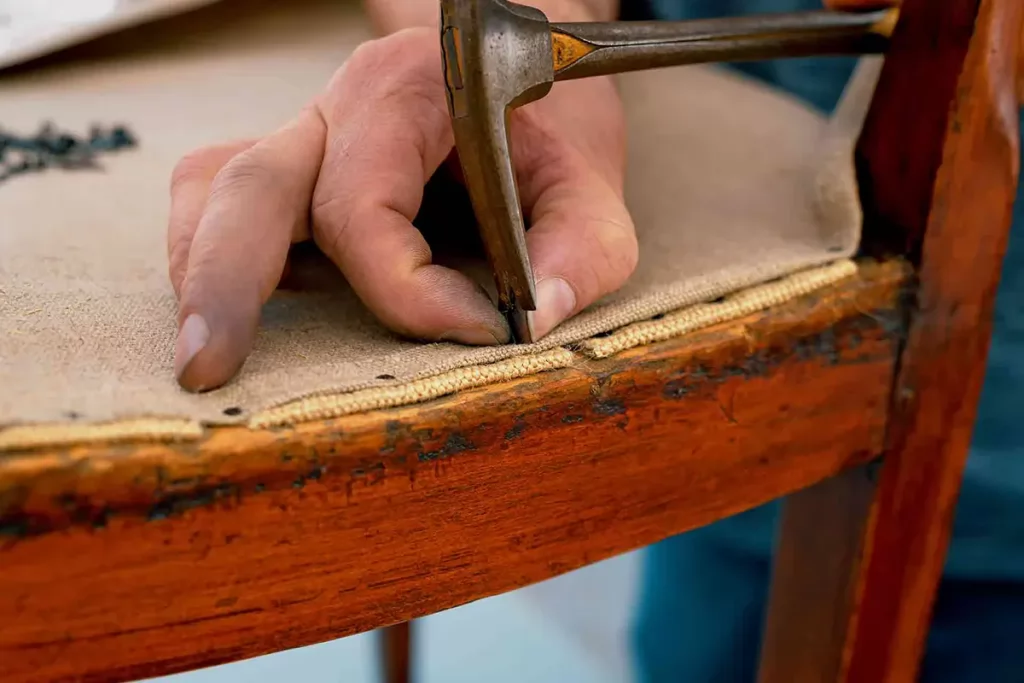
- Cost-effectiveness: New, high-quality furniture can be expensive. In contrast, restoring an existing piece or a secondhand find can achieve similar or even superior quality at a fraction of the cost. For example, an antique wooden chair might need sanding, a fresh coat of paint, and minor repairs. The cost of these materials and labor is often much less than buying a new chair of comparable quality.
- Preservation of Sentimental Value: Furniture often holds memories and sentimental value. It could be the dining table where your family gathered for countless meals, crib for your nursery, or a wooden dresser passed down from your great-grandmother. Restoring these pieces allows you to preserve these memories and maintain a tangible connection to your past.
- Environmental Impact: When you restore furniture, you prevent it from ending in a landfill. Additionally, the process typically requires fewer resources than manufacturing new furniture, often involving deforestation and significant energy consumption.
Assessing the Condition of Your Wood Furniture
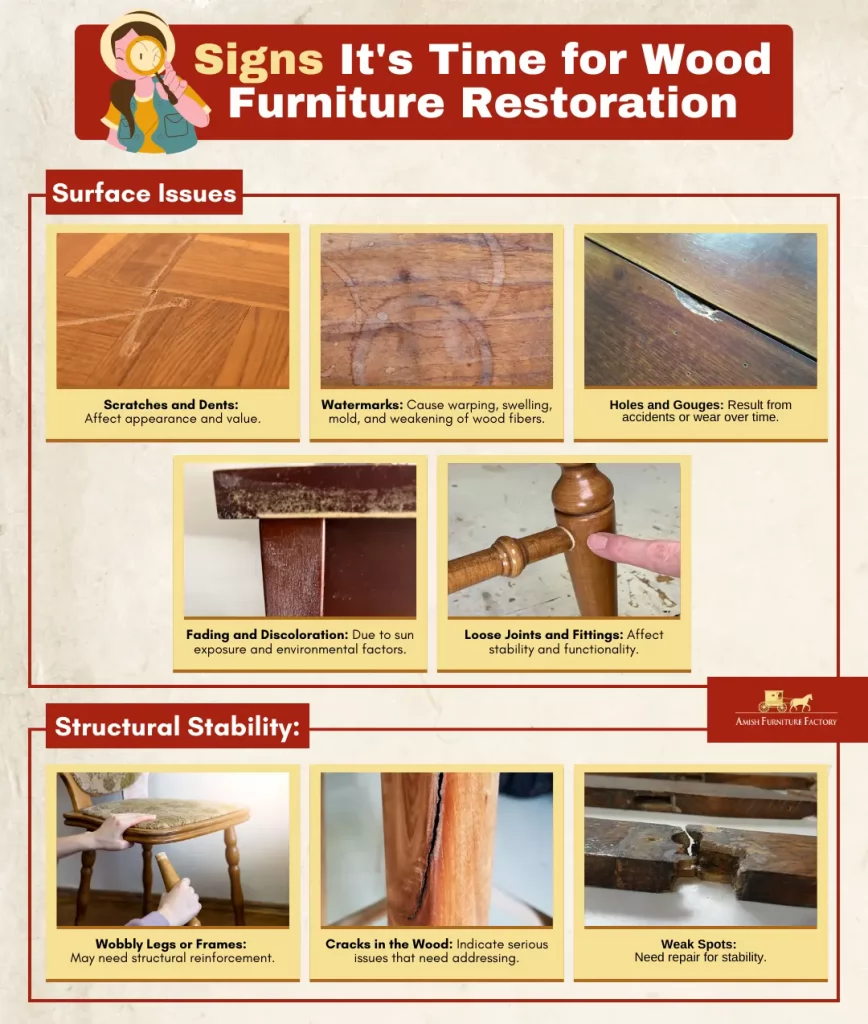
The first step in assessing your furniture is to identify the signs that indicate restoration is necessary. Here are some common signs of damage to look out for:
- Scratches and Dents: Everyday use can lead to surface scratches and dents. While these may seem minor, they can affect the overall appearance and value of the furniture.
- Watermarks: These are typically caused by liquid spills or placing wet items on the wood surface. Watermarks can penetrate the finish and affect the wood underneath, leading to warping, swelling, mold and mildew growth, and even weakening of the wood fibers.
- Holes and Gouges: More severe than scratches and dents, holes and gouges can occur from accidents or wear and tear over time.
- Fading and Discoloration: Exposure to direct sun and other environmental factors can cause the wood to fade or discolor, making the piece look aged and less appealing.
- Loose Joints and Fittings: Over time, the joints and fittings of furniture can become loose, affecting the piece’s stability and functionality.
In addition to physical issues, it’s essential to ensure the furniture’s structural stability. Here’s what to check:
- Wobbly Legs or Frames: The furniture might need structural reinforcement if it wobbles or feels unstable.
- Cracks in the Wood: Cracks can indicate more serious issues with the wood that need to be addressed to ensure the piece’s longevity.
- Weak Spots: Press on various furniture parts to identify any weak spots that might need repair.
Wood Furniture Restoration or Replacement?
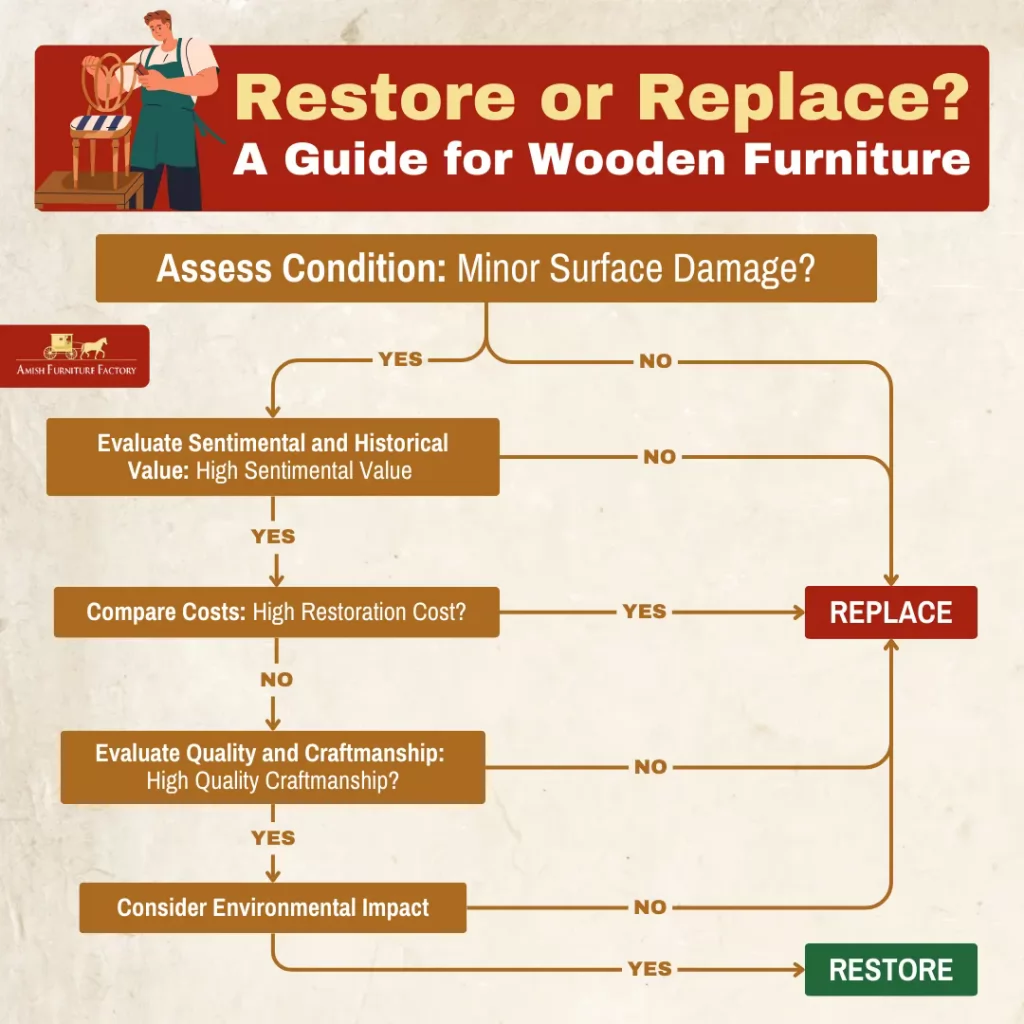
Once you’ve assessed the condition of your wood furniture, the next step is to decide whether to restore or replace the piece.
According to Darren D., a wood expert from ElmWood Flooring Construction Co.:
The key factors in determining whether a piece of furniture is worth restoring include the overall condition of the item, as some may be beyond repair, and whether the restoration will add value. Assessing the furniture’s condition is crucial, as is considering its quality. Sentimental value should also be taken into account to decide if the effort is worthwhile. Additionally, researching restoration costs, estimating the item’s value post-restoration, and comparing DIY efforts versus professional services are important steps.
Preparing for Wood Furniture Restoration
Safety should always be your top priority when restoring wood furniture. The process often involves using sharp tools and potent chemicals and generating dust, which can pose woodworking hazards if incorrectly handled.
Investing in proper PPE is crucial to protect yourself during the restoration process. Here’s what you’ll need:
- Safety Glasses: To shield your eyes from dust, wood chips, and chemical splashes.
- Dust Mask or Respirator: To protect your lungs from dust and fumes. A respirator with replaceable filters is ideal for working with harsh chemicals.
- Gloves: Nitrile gloves are perfect for handling chemicals, while heavy-duty work gloves are great for handling rough materials.
- Ear Protection: If using power tools, earmuffs or earplugs will help protect your hearing.
Gathering Materials and Tools
Having the proper materials and tools is essential for a smooth restoration process. Here’s a list of what you’ll need:
Essential Tools
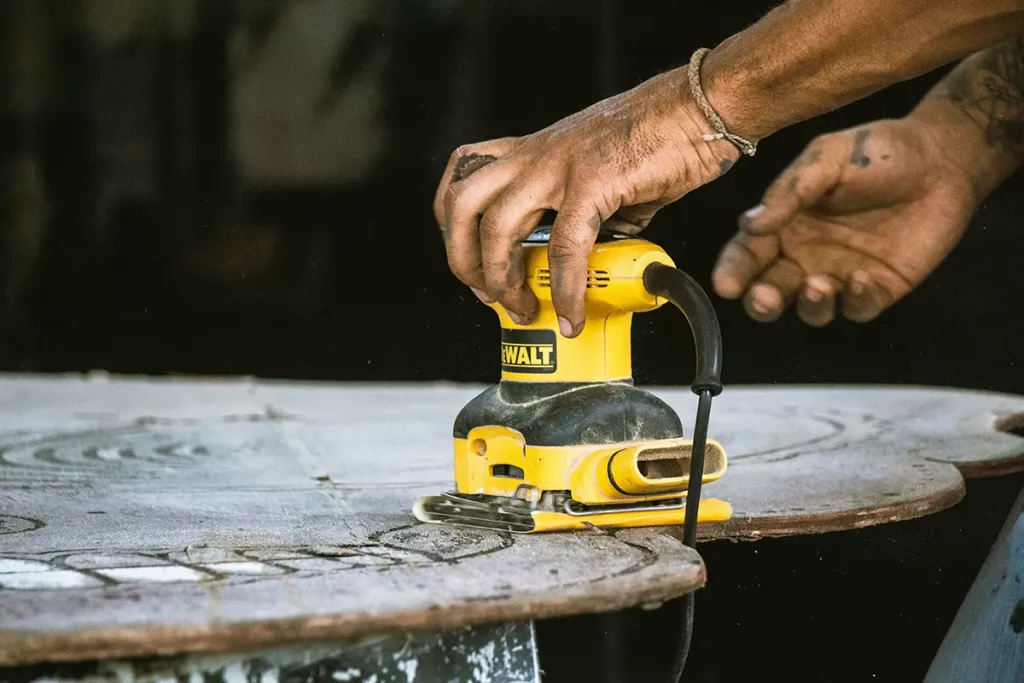
- Sander: An electric sander will save you a lot of time and effort, but you’ll also need various grits of sandpaper for finer work.
- Brushes: Different sizes and types of brushes apply stains, finishing, and cleaning.
- Clamps: Essential for holding pieces together while glue sets.
- Scrapers: These are used to remove old finishes and excess filler.
- Hand Tools: Screwdrivers, chisels, and a mallet for more detailed work.
Materials
- Wood Filler: For filling in cracks, holes, and imperfections.
- Adhesives: Wood glue is a must for fixing loose joints and adding structural integrity.
- Finishes: Depending on your project, this could include stains, varnishes, or paint.
- Cleaning Solutions: Gentle cleaners for prepping the wood surface.
Setting Up Your Workspace
To ensure an efficient workspace, start with good lighting—preferably natural light, but if you’re indoors, use bright and adjustable lights. A sturdy, flat workbench will provide the necessary support for various tasks. Don’t forget to organize your tools and materials to save time and reduce frustration.
Use a pegboard or toolbox to keep your tools within reach and neatly arranged, and store materials in labeled bins or shelves for easy access. Also, keep your workspace clean and clutter-free to work more comfortably and reduce the risk of accidents. Ventilation is also key. Working in a well-ventilated space helps disperse any chemical fumes. If possible, take your project outdoors or work in a garage with the door open to ensure good air circulation.
Cleaning and Stripping
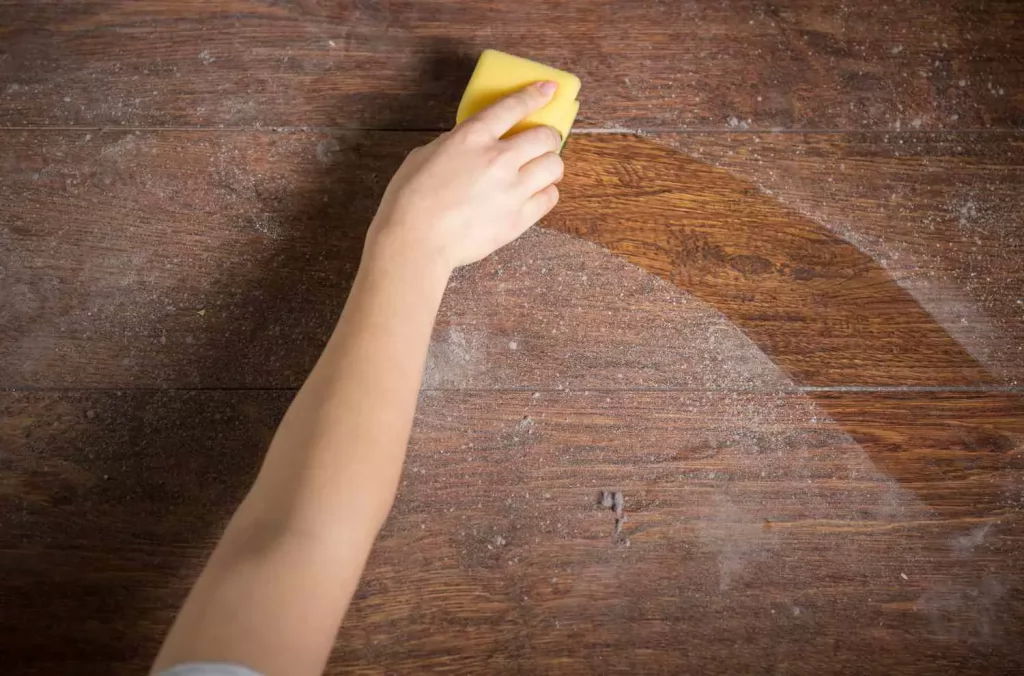
Cleaning your furniture thoroughly before stripping the old finish is crucial for effective restoration. Start with a gentle cleaning solution, such as a mix of dish soap and warm water, applied with a soft microfiber cloth or sponge. For tougher grime, a vinegar and water solution can work, but test it on a hidden area first. After cleaning, wipe off any soap residue with a damp cloth and dry the surface with a microfiber towel to prevent watermarks.
Once the surface is clean, the next step is to strip the old finish. Choosing the right type of stripper is essential and depends on the finish being removed and your preference. Solvent-based strippers are common and effective for various finishes, working quickly and minimizing wood grain raising. Caustic strippers are more aggressive, suitable for tough finishes like varnish and paint, but can darken the wood and require neutralizing. Biochemical strippers are eco-friendly, using natural ingredients to break down finishes, though they may take longer and be less effective on heavy-duty finishes.
Types of Strippers
It’s important to pick the right kind of stripper. Choosing the correct type of stripper depends on the finish you’re removing and your personal preference. Here’s a brief overview of each one:
- Solvent-based Strippers: These are the most common and effective for removing various finishes. They work quickly and are less likely to raise the wood grain.
- Caustic Strippers: These are more aggressive and can remove tough finishes like varnish and paint. However, they can darken the wood and require neutralizing.
- Biochemical Strippers: These are the most environmentally friendly options. They use natural ingredients to break down finishes, but they may take longer to work and might not be as effective on heavy-duty finishes.

Step-by-Step Stripping Process
- Preparation: Ensure your workspace is well-ventilated. Lay down drop cloths to protect your work area, and wear appropriate PPE, gloves, and a respirator.
- Application: Apply the stripper generously with a brush, following the manufacturer’s instructions. Allow it to sit for fifteen minutes to an hour.
- Scraping: Once the finish starts to lift, use a scraper to remove it. Work in the direction of the wood grain to avoid scratching the surface.
- Cleaning Residue: After most of the finish is removed, use steel wool or a nylon brush to clean off any remaining residue. You may need to apply more stripper to stubborn areas.
- Neutralizing (if needed): If using a caustic stripper, neutralize the wood with water and vinegar to stop the chemical reaction. Rinse thoroughly and wait for the wood to dry completely.
Stripping can expose you to strong chemicals and fumes, so taking safety precautions is extremely important. As much as possible, work outdoors or in a well-ventilated area. Always wear gloves, a respirator, and eye protection. Long-sleeved sweatshirts can also help protect your skin from chemical splashes.
Don’t forget to properly dispose of used stripper and finish residue, following local regulations. Many strippers are hazardous waste and should not be poured down the drain.
Repairing Wood Furniture
After cleaning and stripping your furniture, the next step is to address any structural damage and cosmetic imperfections. This stage is crucial for ensuring that your piece is sturdy and functional.
Addressing the Structural Core
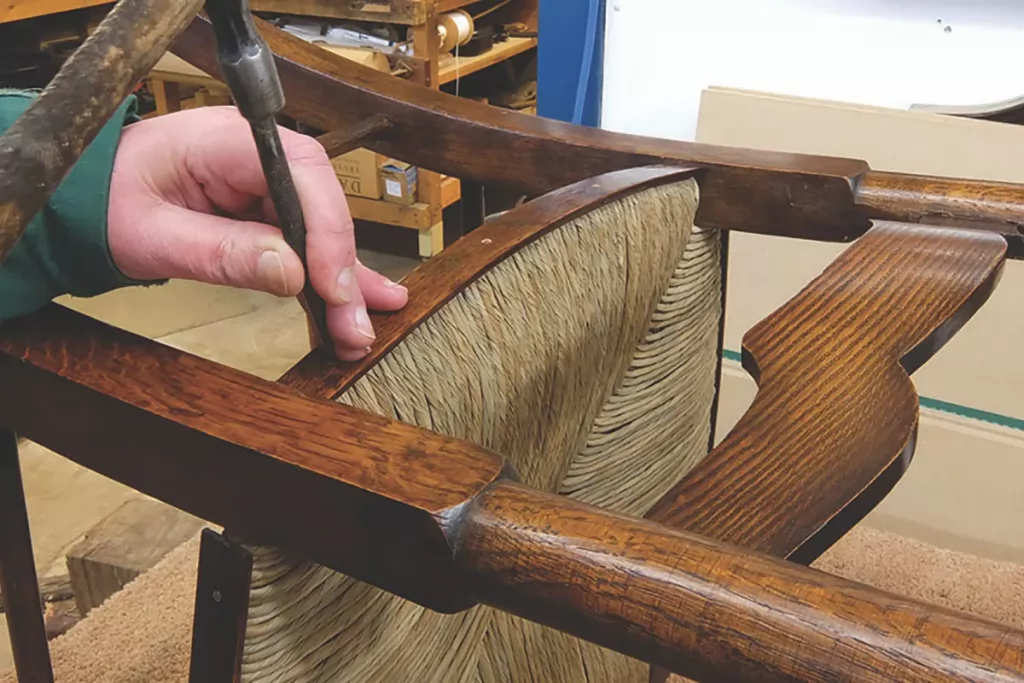
To re-glue loose joints, carefully disassemble the pieces if possible, clean the joint surfaces thoroughly, and apply a strong wood glue. Clamp the pieces tightly together and allow the glue to dry completely. For reinforcing weak areas, consider adding metal corner braces or using dowels and screws to provide extra support and prevent future damage.
Filling and Patching Imperfections
Select a filler based on the damage. Latex fillers are great for small cracks, while epoxy fillers tackle extensive repairs. Solvent-based options offer superior bonding for deep cracks.
For a better understanding, here’s a quick comparison of the different types:
| Filler Type | Ease of Use | Durability | Best For | Cleaning | Handling |
|---|---|---|---|---|---|
| Latex Fillers | Easy to use | Moderate | Small cracks and holes | Water cleanup | Simple and safe |
| Epoxy Fillers | Moderate | Extremely durable | Extensive repairs | Can be sanded and stained | Requires mixing |
| Solvent-based Fillers | Moderate to difficult | Strong bond | Deep cracks | Requires solvents | Needs careful handling and ventilation |
Applying the Fix: Thoroughly clean the area and use a putty knife to apply the filler, pressing it firmly. After drying, sand smooth with fine-grit sandpaper.
Dealing with Veneer Issues
To fix minor chips in your wood furniture, apply a wood filler to the damaged area, then sand it smooth once it has dried. After sanding, use a touch-up stain or marker to match the color with the surrounding area. For addressing bubbles in the veneer, carefully cut a small slit in the bubble with a utility knife. Inject wood glue into the slit and press the area firmly with a weight until the glue dries completely.
If the damage is extensive, re-veneering might be necessary. Here’s how to do it:
- Use a heat gun to soften the old glue, then gently peel off the veneer with a scraper.
- Sand the surface to remove any glue residue and ensure smoothness.
- Measure and cut a new piece of veneer slightly larger than the area you cover.
- Spread an even layer of veneer glue on the surface and the back of the new veneer.
- Position the veneer on the surface and use a veneer roller to press it down firmly, removing any air bubbles. Clamp or weigh it down and allow it to dry completely.
- Trash the excess veneer with a sharp knife. Once the adhesive is dry, sand the edges smooth. Finish with stain or varnish to match the rest of the piece.
Sanding and Smoothing
Sanding is a crucial step in restoring wood furniture. It prepares the surface for staining and finishing, ensuring that the result is smooth and flawless. Whether dealing with flat surfaces, curves, or intricate details, mastering sanding techniques will make all the difference in your restoration project.
Sandpaper comes in various grits, each suited for different tasks:
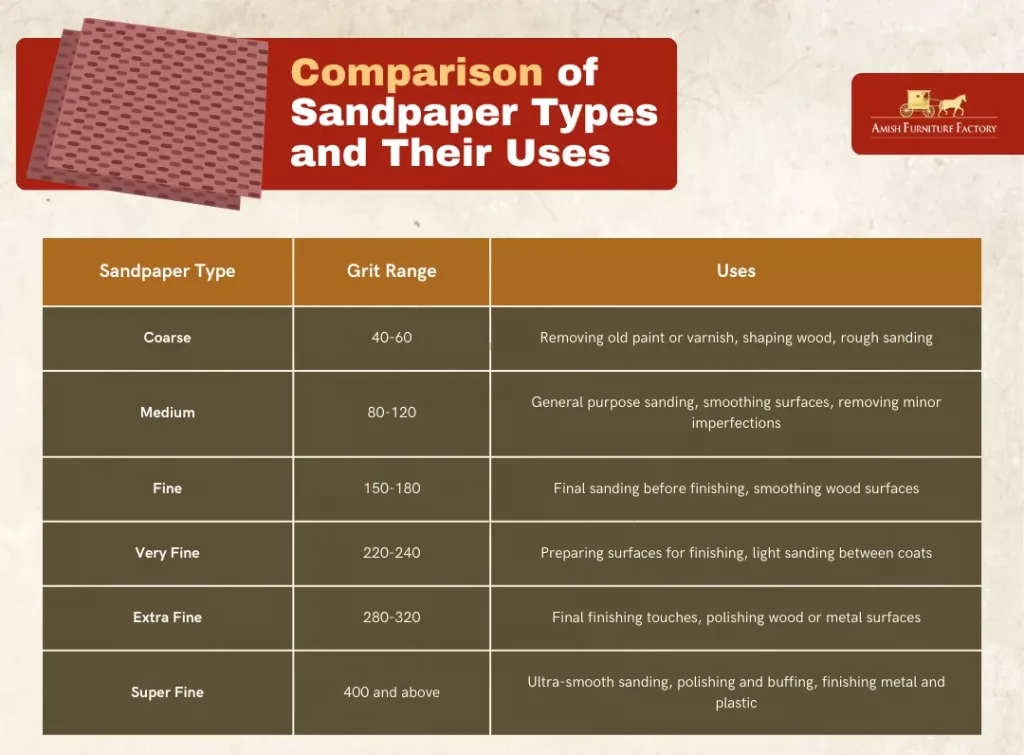
Once you determined the right sandpaper type, you have to decide the right sanding method for your restoration project. You can do it manually or use a power sander.
Manual sanding is ideal for smaller projects, detailed work, and reaching tight corners. It allows for greater control and precision, making it easier to avoid over-sanding or damaging delicate surfaces. It’s also quieter and doesn’t require electricity, making it a convenient option for quick touch-ups.
Power sanding, on the other hand, uses electric or battery-operated sanders to speed up the sanding process. It’s suitable for larger projects and surfaces that require extensive sanding.
Darren shared:
Start sanding with a higher grit paper, like 60 or 80, and work your way down to a lower number if needed but avoid starting with too coarse a grit like 20 or 36 to prevent damaging the wood. After sanding, use a tack cloth to remove any residual dust.
After sanding, it’s essential to further smooth the surface to prepare it for staining or finishing. Using fine abrasive pads can help achieve a smoother finish, especially between coats. Sanding blocks are also useful; they ensure even pressure and help avoid creating grooves or uneven surfaces.
For flat areas, wrap sandpaper around the block, and for curves, use a flexible block. Inspect the surface for any remaining imperfections and sand them with fine-grit sandpaper. Next, clean the surface thoroughly using a vacuum or tack cloth to remove all dust and debris, as this prevents dust from interfering with the finish. Then, lightly sand the edges to remove any sharpness and ensure they accept the finish evenly.
Staining and Finishing
After preparing the surface through sanding and smoothing, it’s time to enhance the beauty of your wood furniture with staining and finishing. These steps not only highlight the natural grain and color of the wood but also protect it from wear and tear.
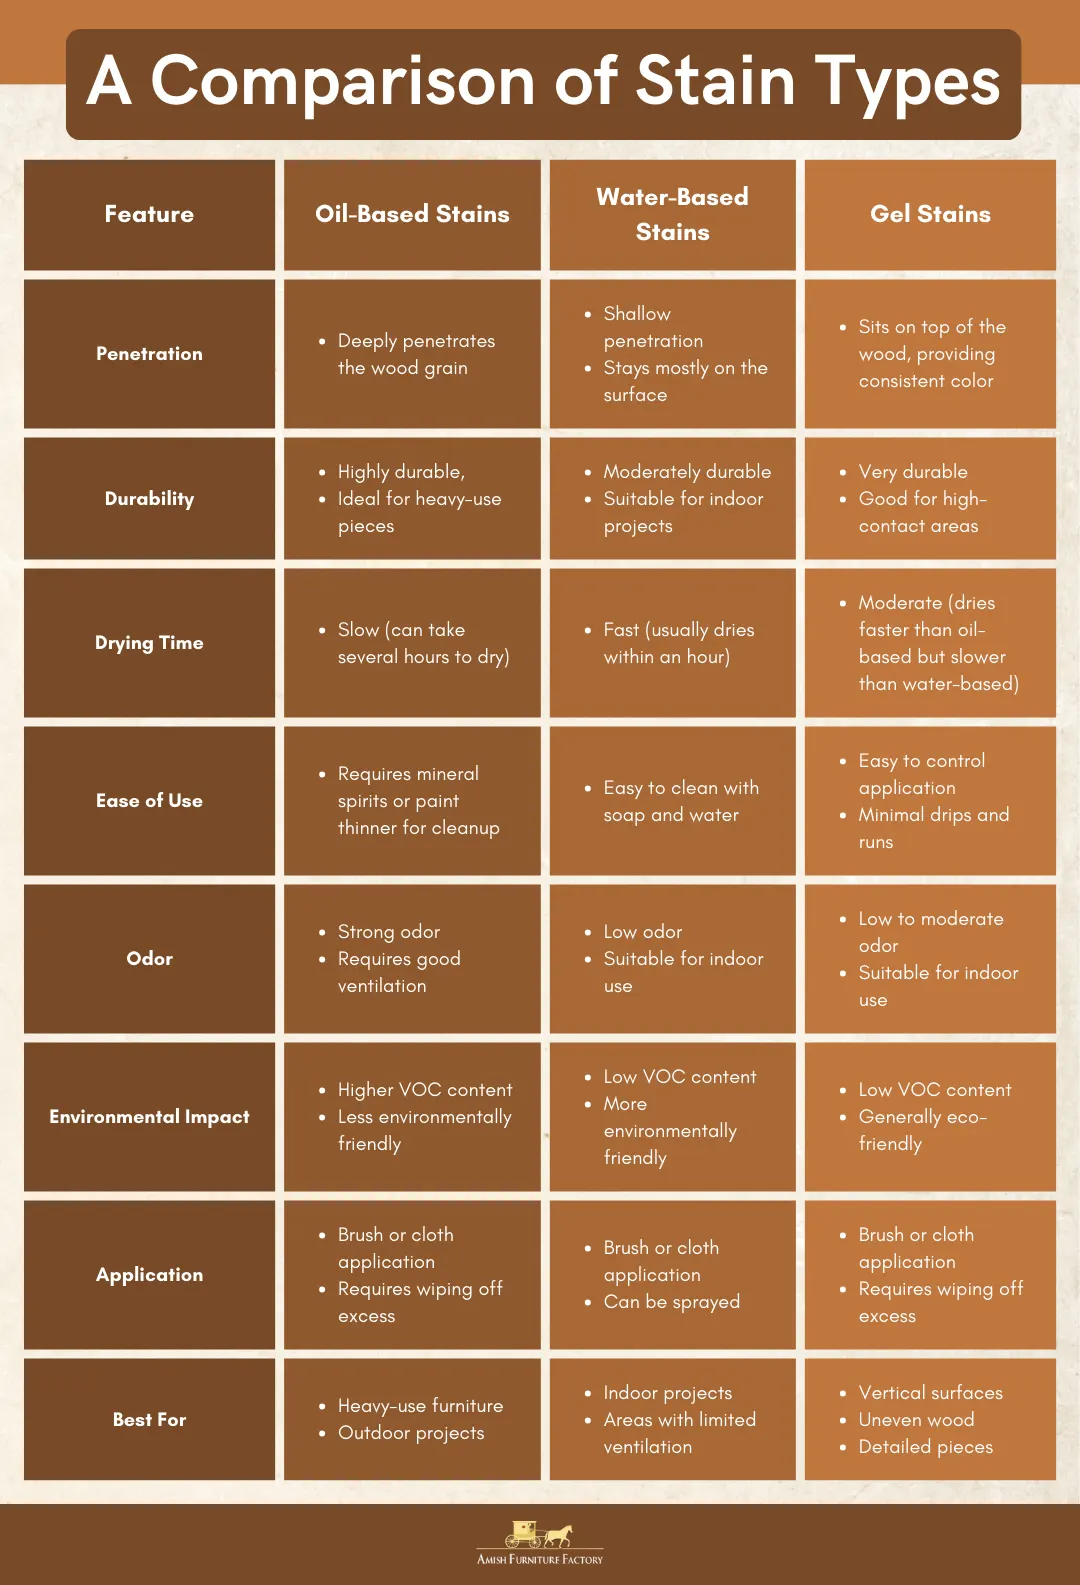
Selecting the right stain is crucial for achieving your desired look. Different types of stains offer unique benefits and challenges. Here’s an overview:
- Oil-Based Stains: The oil penetrates deeply into the wood, enhancing the grain and providing rich, long-lasting color. They are durable and ideal for pieces that will see heavy use.
- Water-Based Stains: Easier to clean up and more environmentally friendly, water-based stains dry quickly and produce less odor. They are great for indoor projects where ventilation might be a concern.
- Gel Stains: Thicker and dense gel stains are excellent for vertical surfaces and uneven wood. They reduce the risk of drips and runs, provide a uniform color, and are easy to control.
…and here’s a more detailed comparison of the different stain types:
Before applying stain to the entire piece, testing it on a small, hidden area is essential. This step helps ensure that the color matches your expectations and complements the wood. Create a sample board using scrap wood similar to your furniture. Apply the stain and finish as you plan to on the actual piece. If the color isn’t right, mix stains or apply additional coats.
Color Matching and Testing
Before applying stain to the entire piece, testing it on a small, hidden area is essential. This step helps ensure that the color matches your expectations and complements the wood.
Create a sample board using scrap wood similar to your furniture. Apply the stain and finish as you plan to on the actual piece. If the color isn’t right, mix stains or apply additional coats.
Applying Finishes
Once the stain is dry, it’s time to protect and enhance the wood with a finish. Finishes come in various forms, each offering different levels of protection and appearance.
- Lacquer: This provides a durable, glossy finish that dries quickly. It is ideal for pieces that need a high-gloss look.
- Varnish: Offers excellent protection against moisture and UV rays, making it suitable for outdoor furniture.
- Polyurethane: In oil— and water-based formulas, polyurethane provides a tough, durable finish. It’s ideal for high-traffic pieces like tabletops and floors.
When applying finishes, choose the method that best suits your project. Brushing with a high-quality brush ensures an even application, but be careful not to overload the brush to avoid drips and runs.
For Chris Langley, Director of Heritage Windows, preparation is key to achieving smooth and flawless finish. He shares:
In order to get a good and a clean finish, preparation is needed and done well. They usually lessen the horizontal grain/feathering effect and therefore do come in handy whenever there is need for a for even coverage. Galvanized screws are then applied through the curved surfaces, which hold it intact until the problem is rectified. For the finish, apply clear polyurethane in several layers and allow sanding after every coat to make the wood look even more professional.
Polishing and Waxing
Polishing and waxing can add the final touch for a smooth and lustrous finish. To achieve this, start with buffing the surface once the final finish coat is dry, using fine steel wool or a buffing pad to smooth it out. Next, apply a thin layer of furniture wax with a soft cloth, rubbing in the direction of the grain. After the wax dries, buff the surface with a clean cloth to achieve a beautiful shine.
Modern Techniques and Innovations in Wood Furniture Restoration
Today, we have access to eco-friendly methods and advanced technologies that make restoration more efficient, sustainable, and precise. Here are some of these cutting-edge approaches:
Eco-Friendly Wood Furniture Restoration Methods
Eco-friendly wood furniture restoration methods focus on minimizing environmental impact while preserving and enhancing the beauty of the wood. Use non-toxic, water-based finishes and stains, which emit fewer volatile organic compounds (VOCs) and are safer for both the environment and your health. One study emphasizes the importance of reducing solvents in formulations to provide environmentally friendly products. The study states:
“The reduction of solvents in paint formulations constitutes a major effort in order to provide environmentally-friendly products that are not harmful to human health“.
Opt for natural or recycled materials for fillers and adhesives, and consider using reclaimed wood for repairs. Additionally, choose hand tools over power tools when possible to reduce energy consumption. These methods not only contribute to a healthier planet but also create a safer and more sustainable restoration process.
Laser Cleaning
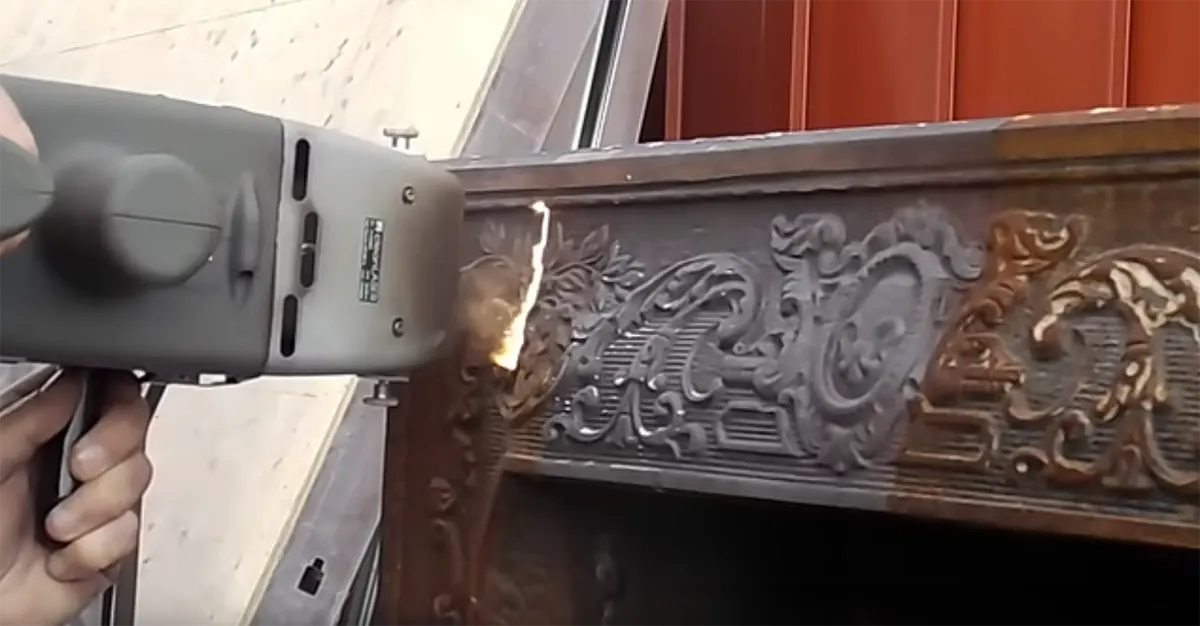
Laser cleaning is a cutting-edge method that uses focused laser beams to remove dirt, grime, and old finishes from wood surfaces. This technique is gaining popularity for several reasons.
First, its precision allows it to target specific areas without damaging the underlying wood, which is particularly useful for intricate carvings and delicate details. Additionally, laser cleaning is eco-friendly; unlike chemical strippers, it doesn’t produce harmful waste or emissions, making it a greener option. Lastly, the process is highly efficient, being faster than traditional methods and saving time and energy while delivering excellent results.
3D Printing for Replacement Parts
3D printing is transforming the way we handle repairs, particularly in replacing missing or damaged parts. This technology offers significant benefits. First, customization allows 3D printers to create parts that perfectly match the original design, making it ideal for intricate components like knobs, handles, and decorative elements.
Modern 3D printers can also use various materials, including wood-like filaments, to produce durable and aesthetically pleasing parts. 3D printing streamlines the process of creating replacement parts, reducing both the time and cost associated with traditional woodworking methods.
Common Restoration Challenges
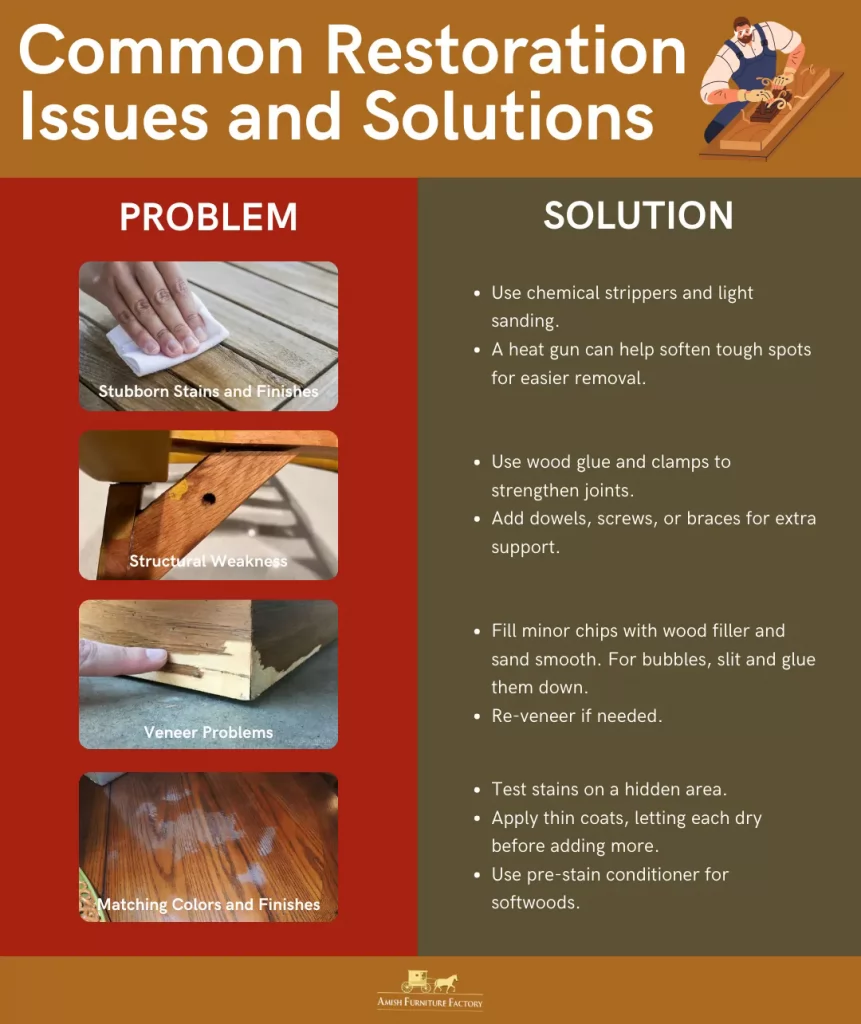
Restoration can present various hurdles, but you can overcome them effectively with the right approach. Here are some of the most common issues you’ll encounter and tips on how to solve them:
Maintenance and Care Post-Restoration
Once you’ve restored your wood furniture, proper maintenance is vital to preserve its beauty and functionality. Here are some tips you can use to keep your restored wood furniture in excellent condition:
- Dust your furniture weekly with a soft, dry cloth. Avoid using feather or other abrasive dusters, which can scratch the surface.
- To prevent watermarks and stains, wipe up spills as soon as possible using a slightly damp microfiber cloth followed by a dry one.
- Use a gentle wood cleaner or a water and vinegar solution for deeper cleaning. Avoid harsh cleaning products, as their chemicals can damage the wood’s finish.
- Keep your furniture in a stable environment to prevent warping or cracking. Use a humidifier or dehumidifier as needed.
- Position your furniture away from windows or use curtains and blinds to limit exposure.
- Avoid placing furniture near heat sources like radiators or fireplaces, as extreme temperatures can damage the wood.
You might be interested in learning the difference between wood vs poly.
The Final Touch: Bringing it All Together
Restoring wood furniture is a journey that combines skill, patience, and a deep appreciation for craftsmanship. Understanding the essentials of assessing, preparing, cleaning, stripping, repairing, sanding, staining, and finishing allows you to breathe new life into your treasured pieces and preserve their history and beauty.
Remember, proper maintenance and care post-restoration are crucial to ensuring your furniture remains beautiful and functional for years to come. Before embarking on a restoration project, especially for pieces with historical value, consider the extent of the damage and your own comfort level.
While this guide equips you with the knowledge and skills to tackle many restoration projects confidently, irreversible damage can be caused by improper techniques. If you’re unsure about your ability to restore a valuable piece, don’t hesitate to seek out a professional furniture restoration service. They possess the expertise and experience to bring your treasured furniture back to life.
FAQs
What is the difference between furniture restoration and refinishing?
Restoration preserves the original look and function by repairing and cleaning, while refinishing involves removing the old finish and applying a new one, significantly changing the appearance.
Is it worth it to restore wood furniture?
Yes, restoring wood furniture is cost-effective, preserves sentimental value, and is environmentally friendly. High-quality pieces often look unique and charming after restoration.
What furniture should not be refinished?
Avoid refinishing pieces with significant historical value, delicate inlays, veneers, or intricate carvings, as refinishing can damage these elements and reduce the piece’s value.
